I now have an Etsy shop! (x)
Not much in it at the moment, but I am finishing up a costume that I'll be listing soon!
Tuesday, October 13, 2015

Wednesday, October 7, 2015


Wednesday, September 23, 2015
Christine Daae Hair Tutorial
 |
| Gina Beck, West End |
 |
| Sarah Brightman, West End |
 |
| Harriet Jones, West End |
 |
| Elizabeth Loyocano, Vegas or Broadway |
Christine Daae's brown curly wig is iconic. There are many different variations, but I'm just going to do a basic overview.
- Decide if you want to heat-set your curls or wet-set them. I personally do the rag-curl method, because even though I have naturally curly hair, it won't hold a heat-set curl. (I also try not to use much heat on my hair to prevent damage.) I usually use 10-12 rags because I have very long and fairly thick hair. You can use a small curling iron or small hot rollers if that's easier for you and your hair. (Be sure to use a heat protectant if you use heat!)
- Curl your hair. Duh. It helps to make all your curls curl toward the back. I separate my hair into 10-12 sections. You may need more or less, depending on your hair. I sleep in the rag-curls. (Cue my mother calling me Medusa.) You want fairly tight ringlets. You might want to add a cream/mousse/etc to prevent frizz.
- Take out your rags, then carefully separate your curls. I usually separate them into about 3, depending on how thick. If you find your curls wanting to frizz up, twist them to smooth them. Just a warning, rag curling will dramatically reduce the length of your hair at first. My hair goes down to my hips, and was reduced to armpit length. The curls do "drop" a bit eventually. Mine end up about waist length.
- If you didn't part your hair in the middle before, do so now. Make another part from ear to ear and separate the front from the back.
- Christine (and the other ballet girls) usually has (have) a slight (or not so slight) Minnie Mouse effect at the front, so tease the front a bit. Loosely twist the front sections back and pin. It might take a few tries to get the twist right for your hair. Keep trying until you like how it looks. Try to pin inside of the twist so the pins don't show. It's a little tricky at first.
- If you have bangs, you might be able to make the forehead curls work for you. Sometimes my "baby hairs" will cooperate, but I usually don't stress over the forehead curls.
I hope this was helpful! I can do a video if anyone is interested!
Sunday, September 20, 2015
1950s Inspired Floral Lawn Dress

Finally a finished project! I finished it in late August, but haven't been able to get a picture of it until recently. This is probably my most-worn dress. It's so comfy!
It's made of vintage cotton lawn that was gifted to me. The bodice is flatlined and fully lined in basic white cotton, and the skirt is lined with white cotton gauze (such a good skirt lining! Super soft and almost like a built in petticoat.) Side zip and hook/eye closure.
The bodice pattern is one I draped a while ago for a failed dress attempt (mostly bad fabric choice, most quilting cottons are not good for apparel), and I adapted it to fit my design. The band sleeve pattern is one I drafted for the same failed dress (it looks so much better in unlined cotton lawn than in a self-lined quilting cotton!) The skirt is literally just a rectangle. I think the skirt circumference is a bit above 100", and the skirt lining is 2 panels of about 48".
Saturday, September 5, 2015
Tsk Tsk
I've been such a bad blogger, I'm so sorry! I have been sewing though, even if its not as much as I'd like. Most of my projects have been modern ones, for every day wear. My wardrobe is desperately in need of revamping, and treating myself to some pretty new clothes (almost) always helps with my depression.
I've finally ordered fabric to make some early 19th cent. stays. I'd started on some over the summer, but they just weren't coming out right, so I'm counting those as practice!
I've finally ordered fabric to make some early 19th cent. stays. I'd started on some over the summer, but they just weren't coming out right, so I'm counting those as practice!
Sunday, August 2, 2015
HSM July: Accessorize- 1830s Plaid Belt
I've been wanting to make a belt to match my plaid dress since I actually made the dress, and it finally happened! I meant to post about this when I actually finished the belt last week, but I've been so busy with tech week and the show. Better late than never. (Also please ignore how bad the dress looks. It is definitely getting remade for September's challenge.)


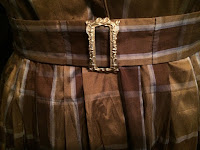
The belt is made of the dress silk whip stitched to a base of cotton duck. It should probably have been buckram or something, but I didn't have any, and couldn't get to anywhere that sold it. The 'buckle' was a lucky clearance find at Hobby Lobby (I bought it for around $1.50, and I actually found another one and got that one too). It's actually supposed to be a fancy jar label, but I took off the paper backing and glued some gold-coloured copper wire to the back to make it into a slide-type buckle.
The Challenge: Accessorize
Fabric: A bit of brown/blue plaid shantung silk and a bit of tan cotton duck
Year: I was shooting for 1830s, but I think the method could at least work for different decades.
Notions: Fancy jar label, gold-coloured copper wire, glue
How Historically Accurate is It?: Tolerably, I think? Fabrics could be better, though.
Hours to Complete: So many. I obsessed about making the stitches perfectly even.
First Worn: Not yet!
Total Cost: Probably less than $5 for the amount of materials I actually used.


The belt is made of the dress silk whip stitched to a base of cotton duck. It should probably have been buckram or something, but I didn't have any, and couldn't get to anywhere that sold it. The 'buckle' was a lucky clearance find at Hobby Lobby (I bought it for around $1.50, and I actually found another one and got that one too). It's actually supposed to be a fancy jar label, but I took off the paper backing and glued some gold-coloured copper wire to the back to make it into a slide-type buckle.
The Challenge: Accessorize
Fabric: A bit of brown/blue plaid shantung silk and a bit of tan cotton duck
Year: I was shooting for 1830s, but I think the method could at least work for different decades.
Notions: Fancy jar label, gold-coloured copper wire, glue
How Historically Accurate is It?: Tolerably, I think? Fabrics could be better, though.
Hours to Complete: So many. I obsessed about making the stitches perfectly even.
First Worn: Not yet!
Total Cost: Probably less than $5 for the amount of materials I actually used.
Saturday, June 20, 2015
HSM: June: Out of Your Comfort Zone
 |
| Finished, except for the hem, which was done after the picture was taken. |
Challenge: June- Out of Your Comfort Zone
Fabric: 2 or 3 yards of blue and white gingham, probably a poly/cotton blend (originally bought for a Dorothy Gale costume that never happened).
Pattern: Sensibility 1940s "Swing" Dress
Year: The pattern says 1942!
Notions: Cotton thread, snaps, blue ricrac
How historically accurate is it? I'd say mostly. Good pattern, but I'm not sure about the fabric and the ricrac.
Hours to complete: I have no idea. Not that long though.
First worn: Not yet!
Total Cost: About $10 for the pattern, maybe $1-$2 for the amount of snaps I used, and the fabric, ricrac, and thread were in my stash. Total cost was about $20-$25, including stash materials.
Subscribe to:
Posts (Atom)