I'll preface this by saying that I didn't make the overalls or playsuit, just the trousers.
I enjoyed making up this pattern! I used it for my character's (Hostess of the Garter) trousers. I unfortunately don't have pictures other than mirror selfies, but I will edit in if I find any.
The Facts:
Pattern name: WWII Homefront- 1940s Overalls, Playsuit, Trousers
Size range: 30" 24" 33"- 46" 40" 49" in 3 different size groups
Size I made: Size 46 (46" 40" 49"), but I graded up a bit to accommodate my very generous hips
Difficulty: Pretty easy! Of course, I only made the trousers, but they were still pretty easy. They were my first pair of pants/trousers, and it was a good pattern to start out with, imo. I didn't use the instructions because I'm me, so I can't comment on them.
Fit: I graded up the hips (and maybe the waist, since I wanted the "waist" at my high hip)
Fabric requirments: 2 yards- 2-1/2 yards for the trousers
Make again?: Probably not, at least for a while. But I may make some tap pants using this pattern as a base
Recommend to a friend?: Most likely!
Overall rating: 4/5! All in all, this is a great pattern, though I do wish there was a larger size range.
(This review consists of my own unbiased opinions; I was not compensated by, nor am I affiliated with Wearing History)
Friday, April 29, 2016

Friday, April 8, 2016
Merry Wives Progress
I've been meaning to update more for you all, but I've basically been sewing my ass off for this show. We had the photoshoot last Friday, and I had such a blast styling Mistress Page (red silk) and Mistress Ford (blue velvet). The hair and makeup were just quick-and-dirty 1940s, but I think my girls looked absolutely fabulous.
I'll make a post about the construction of the costumes after the show!


I'll make a post about the construction of the costumes after the show!


Friday, March 18, 2016
Pattern Review: Colette Sorbetto
I'm going to attempt to do a pattern review for you all every so often, we'll see if I keep this up.
Y'all, I love this pattern. This will probably end up being a rave.

The facts:
Pattern name: Sorbetto (Colette 0003)
Size range: 0-18
Size I made: 18
Difficulty: Very easy!
Fit: On the snug side, but I'm on the top end of their measurements, so I expected that. Didn't expect it to be on the short side though. I have adjusted for future versions.
Fabric requirements: I can easily get one out of a yard of 55"-60" fabric. 1.5-2 yards for narrower fabrics though.
Make again?: Absolutely!! This version was a wearable muslin, which I'll probably end up giving to my mom. I have one in the making, and fabric for at least 3 more. I have a feeling I'll be living in Sorbettos all summer.
Recommend to a friend?: Absolutely! I actually have recommended it to a friend.
Overall rating: 4.5/5! I wish the size range was larger, but I'm honestly used to having to adjust patterns, so it really isn't a huge deal. It's also a free download, which is a huge plus!
Monday, March 14, 2016
You are the worst, Burr
I'm the worst blogger ever, I'm so sorry! Life has been wild. I made two gowns that transformed from sheath dresses to mermaid gowns for a production of Dreamgirls (while in the early stages of recovering from my breast reduction), ended a 2 year long relationship, and started costuming a production of Merry Wives of Windsor, which I'm also acting in.
Here's some Merry Wives progress! This costume is for Mistress Quickly, and I'm using a great vintage flannel from The Tin Thimble on etsy, and a (poly/silk blend??) taffeta my grandmother gave to me a while back. Our concept is post-WWII film noir.
Also to make is a royal blue stretch velvet dress for Mistress Ford, a red silk dupioni dress for Mistress Page, an emerald green rayon challis dress for Anne Page, and slacks and a blouse for myself (Hostess of the Garter). I'm nervous about making my slacks because I've never made pants before. But the director wants my character to be a Lauren Bacall/Katharine Hepburn kind of woman, so fabulous pants are a must.
Here's some Merry Wives progress! This costume is for Mistress Quickly, and I'm using a great vintage flannel from The Tin Thimble on etsy, and a (poly/silk blend??) taffeta my grandmother gave to me a while back. Our concept is post-WWII film noir.
 |
| Just pinned on Phoebe, minus sleeves |
 |
| That back-bodice plaid matching tho |
Friday, January 15, 2016
I'm alive!
I made it through my surgery! I'm currently in a ton of pain, but today should be the worst of it.
I'm making a costume for a production of Dream Girls, which I'm totally excited about. I made sure to cut most everything out before my surgery because I definitely cannot get down on the floor in my current state. I hate poly satin.
I also have 5 lengths of fabric waiting to be made up into Colette Sorbettos. I'm so excited to get them cut out.
I'm making a costume for a production of Dream Girls, which I'm totally excited about. I made sure to cut most everything out before my surgery because I definitely cannot get down on the floor in my current state. I hate poly satin.
I also have 5 lengths of fabric waiting to be made up into Colette Sorbettos. I'm so excited to get them cut out.
Monday, January 4, 2016
Historical Sew Monthly 2016 Planning
I wasn't exactly successful at completing all of the challenges last year, but I'm hoping to do better this year!
The challenges are:
January – Procrastination – finish a garment you have been putting off finishing (a UFO or PHD) or make something you have been avoiding starting.
February – Tucks & Pleating – make a garment that features tucks and pleating for the shape or decoration
March – Protection – make something to protect yourself (from weather or injury) or your clothes (from soiling etc.)
April – Gender-Bender – make an item for the opposite gender, or make an item with elements inspired by the fashions of the opposite gender
May – Holes – sometimes the spaces between stuff are what makes a garment special. Make a garment that is about holes, whether it is lace, slashing, eyelets, etc.
June – Travel – make a garment for travelling, or inspired by travel.
July – Monochrome – make a garment in black, white, or any shade of grey in between.
August – Pattern – make something in pattern, the bolder and wilder the better.
September – Historicism – Make a historical garment that was itself inspired by the fashions of another historical period.
October – Heroes – Make a garment inspired by your historical hero, or your historical costuming hero.
November – Red – Make something in any shade of red.
December – Special Occasion: make something for a special event or a specific occasion, or that would have been worn to special event of specific occasion historically
The challenges are:
I plan on finishing a mid-19th century apron I started a while back!
Maybe a chemisette with some pretty tucks. Or a petticoat; petticoats are always a good idea.
I'm thinking an earlyish 19th cent. chemise (which protects your outer garments from sweat and other gross things)
Maybe a shirt for Dylan. I've been wanting to make him one but haven't gotten around to it.
Corded stays. I've been wanting to make them forever, and I think I should be recovered and "settled" enough to get a good fit in the bust. (holes would be the eyelets for lacing)
I have no idea, I'll have to research a bit! Maybe a bonnet veil.
Ooh I don't know!
My green 1830s dress! I have sleeves and a skirt cut out and sewn. The pattern is rather bold and wild!
Maybe something regency. Regency drew lots of inspiration from classical greece/rome.
Who knows!
A dress out of my beautiful pink cotton print, maybe. I think pink counts as a shade of red!
I shall have to find a special occasion for which to make something!
Friday, January 1, 2016
Gold Dotty Skirt progress
I'm actually doing some sewing! I'm making the cutest skirt on earth.
It's all just pinned up on Phoebe, but it's coming along nicely. I've sewn up the pockets, and they are waiting to be sewn in. I've also used fusible interfacing for the first time! It was surprisingly easy to use.
 |
| From my Instagram |
Once I finish it, I'll be putting it up in my etsy shop as a made to order, if you happen to want your very own! I'm sure it's going to become a staple in my wardobe.
xx,
Kate
xx,
Kate
Saturday, December 26, 2015
Christmas Goodies!
I just got some amazing fabrics from Fabric.com. I ordered them, thinking that they wouldn't come until next week, but here they are!
The fabric on the left is this stunning metallic border print. I am so in love with it. It will become a skirt! The three on the right are scrummy rayon challis (x, x, x) The black will become a skirt that may go up in my etsy as a made to order item. The gingham and dot will probably become tops after my surgery.
xx.
Kate
 |
| Taken from my instagram |
xx.
Kate
Friday, December 25, 2015
Happy Holidays!
Merry Christmas to all of you who celebrate! I hope your Christmas (or just a regular Friday) was wonderful!
I got a lovely new dressform! It's actually my size, and it's so much prettier than my adjustable one!
Her name is Phoebe. Bought from here in size 18/20. I'm currently a bit bigger than her, but I am scheduled for a breast reduction and a bit of lipo in January, so it's all good.
I also got my very first serger! I don't have a picture of it because I haven't been able to set it up yet, as I'm currently bunking with my mom. I got the Brother 1634D. I'm very excited, well excited and scared, to use it.
As my Christmas present to myself, I've bought a gorgeous vintage cream and green floral taffeta that is dying to become a 1950s dress, and I have some very exciting fabric on the way from Fabric.com.
xx,
Kate
I got a lovely new dressform! It's actually my size, and it's so much prettier than my adjustable one!
Her name is Phoebe. Bought from here in size 18/20. I'm currently a bit bigger than her, but I am scheduled for a breast reduction and a bit of lipo in January, so it's all good.
 |
| Isn't she so beautiful? |
As my Christmas present to myself, I've bought a gorgeous vintage cream and green floral taffeta that is dying to become a 1950s dress, and I have some very exciting fabric on the way from Fabric.com.
xx,
Kate
Sunday, November 8, 2015
Indie Pattern Suggestions
Does anyone have any Indie Pattern suggestions for me? I usually make my own patterns, but there are things I don't feel skilled enough to pattern (and also too lazy). I'm mostly looking for tops, sweaters, and tights/leggings. It would be preferable if the patterns went into plus sizes, but I can usually deal with xl/18ish. Thanks everyone!
Tuesday, November 3, 2015
HSM: Sewing Secrets
I've been taking a bit of a hiatus from HSM, not on purpose, but life happened. Part of my halloween costume somewhat went along with October's challenge, though! I hope to get back in the groove soon.
The Facts:
The Challenge: Sewing Secrets
Fabric: Poly (probably) damask, cotton duck for interlining, tan cotton for lining, checked cotton for secret armhole facing, poly satin for piping
Pattern: My own!
Year: Vaguely 16th/18th century
Notions: Heavy duty cable ties for boning, cotton yarn for piping, beading lace, poly satin ribbon
How historically accurate is it? Not very. The bodice is a very stylized version of stays
Hours to complete: lots and lots
First worn: Halloween!
Total cost: I think everything was in the stash, so none at this time, but I'd guess $15-$20
 |
| Excuse the awkward face and the weird bodice lacing |
 |
| The secret! |
The Facts:
The Challenge: Sewing Secrets
Fabric: Poly (probably) damask, cotton duck for interlining, tan cotton for lining, checked cotton for secret armhole facing, poly satin for piping
Pattern: My own!
Year: Vaguely 16th/18th century
Notions: Heavy duty cable ties for boning, cotton yarn for piping, beading lace, poly satin ribbon
How historically accurate is it? Not very. The bodice is a very stylized version of stays
Hours to complete: lots and lots
First worn: Halloween!
Total cost: I think everything was in the stash, so none at this time, but I'd guess $15-$20
Tuesday, October 20, 2015
Purple Paisley Dress!
I actually finished this dress and got pictures a couple of weeks ago, but I never got around to writing up a blog post. But here it is! (Sorry for the headless pictures again, I can't seem to control both my face and body at the same time for a picture.)


(Sorry for the long line of pictures! I had them arranged nicely, but apparently they wanted to go all wonky,)
It's made from the same basic pattern as my floral border print dress, but I adapted it to have a cross-over neckline.
This dress is made of 3 yards of 36" wide vintage cotton with a woven self stripe and a purple paisley print. I'm so in love with this fabric. Not only is it beautiful, but it was lovely to work with. I just barely got my dress out of the yardage, but I did it! The bodice is lined with white cotton twill, and the skirt is lined with cotton gauze. The dress closes with a hand-sewn zipper on the left side. I even put a patch pocket for my phone!
I'm very happy with this dress! It probably cost me less than $10, because the paisley was gifted to me.
I've got a couple more dresses on the to-do list! They'll most likely end up being 1950s-esque fit and flare silhouettes, because that's my favourite style right now. And I've made a pattern for a wrap skirt to wear to ballet class, which I'm going to make up in purple chiffon. I've also been wanting to try my hand at making some tights/leggings, some cropped cardigans, and maybe a coat for winter. (I'm dreaming of a sunshine yellow or aqua full-skirted coat in wool, a cardigan in every colour, and comfy, non-itchy tights!)
xx, Kate
Tuesday, October 13, 2015
Etsy shop!
I now have an Etsy shop! (x)
Not much in it at the moment, but I am finishing up a costume that I'll be listing soon!
Not much in it at the moment, but I am finishing up a costume that I'll be listing soon!
Wednesday, October 7, 2015


Wednesday, September 23, 2015
Christine Daae Hair Tutorial
 |
| Gina Beck, West End |
 |
| Sarah Brightman, West End |
 |
| Harriet Jones, West End |
 |
| Elizabeth Loyocano, Vegas or Broadway |
Christine Daae's brown curly wig is iconic. There are many different variations, but I'm just going to do a basic overview.
- Decide if you want to heat-set your curls or wet-set them. I personally do the rag-curl method, because even though I have naturally curly hair, it won't hold a heat-set curl. (I also try not to use much heat on my hair to prevent damage.) I usually use 10-12 rags because I have very long and fairly thick hair. You can use a small curling iron or small hot rollers if that's easier for you and your hair. (Be sure to use a heat protectant if you use heat!)
- Curl your hair. Duh. It helps to make all your curls curl toward the back. I separate my hair into 10-12 sections. You may need more or less, depending on your hair. I sleep in the rag-curls. (Cue my mother calling me Medusa.) You want fairly tight ringlets. You might want to add a cream/mousse/etc to prevent frizz.
- Take out your rags, then carefully separate your curls. I usually separate them into about 3, depending on how thick. If you find your curls wanting to frizz up, twist them to smooth them. Just a warning, rag curling will dramatically reduce the length of your hair at first. My hair goes down to my hips, and was reduced to armpit length. The curls do "drop" a bit eventually. Mine end up about waist length.
- If you didn't part your hair in the middle before, do so now. Make another part from ear to ear and separate the front from the back.
- Christine (and the other ballet girls) usually has (have) a slight (or not so slight) Minnie Mouse effect at the front, so tease the front a bit. Loosely twist the front sections back and pin. It might take a few tries to get the twist right for your hair. Keep trying until you like how it looks. Try to pin inside of the twist so the pins don't show. It's a little tricky at first.
- If you have bangs, you might be able to make the forehead curls work for you. Sometimes my "baby hairs" will cooperate, but I usually don't stress over the forehead curls.
I hope this was helpful! I can do a video if anyone is interested!
Sunday, September 20, 2015
1950s Inspired Floral Lawn Dress

Finally a finished project! I finished it in late August, but haven't been able to get a picture of it until recently. This is probably my most-worn dress. It's so comfy!
It's made of vintage cotton lawn that was gifted to me. The bodice is flatlined and fully lined in basic white cotton, and the skirt is lined with white cotton gauze (such a good skirt lining! Super soft and almost like a built in petticoat.) Side zip and hook/eye closure.
The bodice pattern is one I draped a while ago for a failed dress attempt (mostly bad fabric choice, most quilting cottons are not good for apparel), and I adapted it to fit my design. The band sleeve pattern is one I drafted for the same failed dress (it looks so much better in unlined cotton lawn than in a self-lined quilting cotton!) The skirt is literally just a rectangle. I think the skirt circumference is a bit above 100", and the skirt lining is 2 panels of about 48".
Saturday, September 5, 2015
Tsk Tsk
I've been such a bad blogger, I'm so sorry! I have been sewing though, even if its not as much as I'd like. Most of my projects have been modern ones, for every day wear. My wardrobe is desperately in need of revamping, and treating myself to some pretty new clothes (almost) always helps with my depression.
I've finally ordered fabric to make some early 19th cent. stays. I'd started on some over the summer, but they just weren't coming out right, so I'm counting those as practice!
I've finally ordered fabric to make some early 19th cent. stays. I'd started on some over the summer, but they just weren't coming out right, so I'm counting those as practice!
Sunday, August 2, 2015
HSM July: Accessorize- 1830s Plaid Belt
I've been wanting to make a belt to match my plaid dress since I actually made the dress, and it finally happened! I meant to post about this when I actually finished the belt last week, but I've been so busy with tech week and the show. Better late than never. (Also please ignore how bad the dress looks. It is definitely getting remade for September's challenge.)


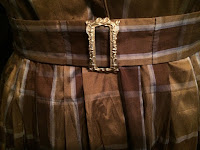
The belt is made of the dress silk whip stitched to a base of cotton duck. It should probably have been buckram or something, but I didn't have any, and couldn't get to anywhere that sold it. The 'buckle' was a lucky clearance find at Hobby Lobby (I bought it for around $1.50, and I actually found another one and got that one too). It's actually supposed to be a fancy jar label, but I took off the paper backing and glued some gold-coloured copper wire to the back to make it into a slide-type buckle.
The Challenge: Accessorize
Fabric: A bit of brown/blue plaid shantung silk and a bit of tan cotton duck
Year: I was shooting for 1830s, but I think the method could at least work for different decades.
Notions: Fancy jar label, gold-coloured copper wire, glue
How Historically Accurate is It?: Tolerably, I think? Fabrics could be better, though.
Hours to Complete: So many. I obsessed about making the stitches perfectly even.
First Worn: Not yet!
Total Cost: Probably less than $5 for the amount of materials I actually used.


The belt is made of the dress silk whip stitched to a base of cotton duck. It should probably have been buckram or something, but I didn't have any, and couldn't get to anywhere that sold it. The 'buckle' was a lucky clearance find at Hobby Lobby (I bought it for around $1.50, and I actually found another one and got that one too). It's actually supposed to be a fancy jar label, but I took off the paper backing and glued some gold-coloured copper wire to the back to make it into a slide-type buckle.
The Challenge: Accessorize
Fabric: A bit of brown/blue plaid shantung silk and a bit of tan cotton duck
Year: I was shooting for 1830s, but I think the method could at least work for different decades.
Notions: Fancy jar label, gold-coloured copper wire, glue
How Historically Accurate is It?: Tolerably, I think? Fabrics could be better, though.
Hours to Complete: So many. I obsessed about making the stitches perfectly even.
First Worn: Not yet!
Total Cost: Probably less than $5 for the amount of materials I actually used.
Saturday, June 20, 2015
HSM: June: Out of Your Comfort Zone
 |
| Finished, except for the hem, which was done after the picture was taken. |
Challenge: June- Out of Your Comfort Zone
Fabric: 2 or 3 yards of blue and white gingham, probably a poly/cotton blend (originally bought for a Dorothy Gale costume that never happened).
Pattern: Sensibility 1940s "Swing" Dress
Year: The pattern says 1942!
Notions: Cotton thread, snaps, blue ricrac
How historically accurate is it? I'd say mostly. Good pattern, but I'm not sure about the fabric and the ricrac.
Hours to complete: I have no idea. Not that long though.
First worn: Not yet!
Total Cost: About $10 for the pattern, maybe $1-$2 for the amount of snaps I used, and the fabric, ricrac, and thread were in my stash. Total cost was about $20-$25, including stash materials.
Tuesday, May 26, 2015
A lovely painting
 |
| "English School, Circa 1830, Portrait of a lady in a black dress" |
I've even tried out her hairstyle, and it actually works with my long, thick, stubborn hair. I do resemble her a bit, or at least that's what a friend told me.
Subscribe to:
Posts (Atom)