 |
| Isn't it lovely? I apologize for the wrinkled state of it and my comforter. |
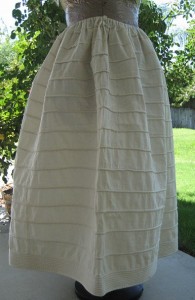
I'd originally planned on doing 100 rows with no spaces in between them, but I quickly decided against that. I ended up doing 55 rows in this configuration from the bottom up: 15 rows, a 2-inch space, 10 rows, a 2 inch space, 15 rows, a 2-inch space, 10 rows, a 2-inch space, 5 rows. Well, the spaces may not be exactly 2-inches; I used my spool of thread as a guide. Close enough, right?
.JPG) |
| My first row of cord. I felt so accomplished. |
After the first row, I ran into a dilemma. The seam allowance from the hem seam was getting in the way and bunching up, making the second row difficult to pin. It took me a few minutes to think of trimming the seam allowance. I trimmed it very close to the stitching of the first row, and the second row was infinitely easier to pin and sew.
.JPG) |
| A detail shot of the beginning/ending of section |
After I finished sewing in all the rows of cording, I trimmed back the inner layer with pinking shears, but I'll probably trim it down again, closer to the cords. This left me with about 0.5-1 yard of cotton, which has become a few petticoat waistbands and a pair of chemise sleeves. I finished it off by gathering the waist, adding a waistband, and sewing on a button. I haven't sewn a buttonhole yet. I will when I finish my corset and finalize my waist measurement.
.JPG) |
| Sewing in cording |
.JPG) |
| Even a few rows added some body. |
The petticoat falls to about my upper-mid calf, which is perhaps a tad short, but that's how it happened. It measures to be about 88 inches wide. I wanted it to be 90 because I like round numbers, but I could only find 44 inch wide cotton. The cording comes up to my upper thigh/lower hip, which seems to be within the range of the period. I've seen some 1820s-30s corded petticoats with cords in just the lower 1/3 (like this), and I've also seen some later ones with cording all the way or almost all the way to the waist (like this).
Overall, I'm very happy with it. It's less than perfect, but it was my first real historical piece of clothing, and I'm very proud of it.
No comments:
Post a Comment